

I’m trying to print this part out of Filament-PM TPE32 on a Prusa Mk4 with a textured sheet and I’m not having much luck.
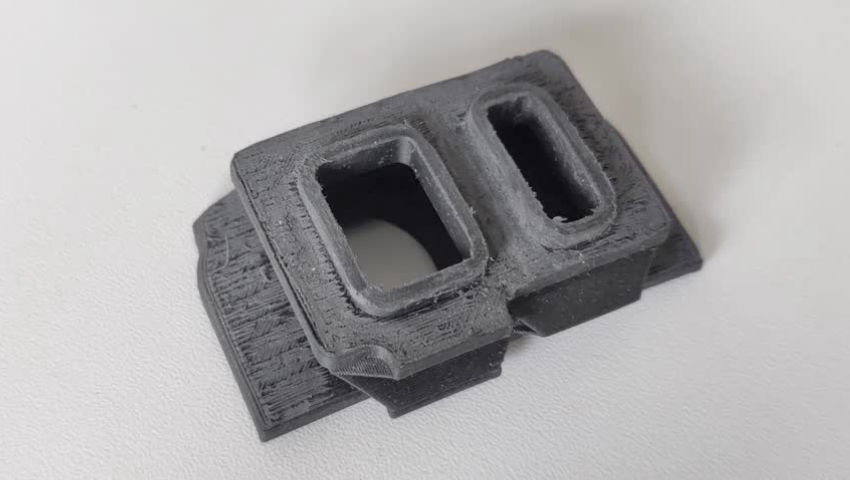
The part is a bellows with a 100%-infill plate at the top and at the bottom. Despite leaving a giant brim inside and out, the whole thing has minimal adhesion to the bed and invariably comes off when the print reaches the top-heavy section of the part.
It’s maybe the 10th print I’m attempting, slowly trying to dial in the parameters. I had to crank up the bed temperature to 47 degrees for the first layer to achieve any kind of adhesion, which is odd. I have other TPU/TPE filaments that stick better (but they’re too hard for my purpose).
I could achieve slightly better adhesion by cranking up the nozzle temperature above 235C, but then it start stringing so bad it leaves raised obstacles almost immediately on the first layer while building the brim, and then the head slams into the obstacles and dislodges the brim at the second layer. The only way to get a good brim (and a good part) is to lower the nozzle temperature to 223C.
Clearly the problem is that the Prusa Mk4 is a bed slinger: it shakes the part loose. We have a Prusa XL on the way that should take care of the problem, but it’s coming in 3 weeks and I need the part now.
Before I slather the bed sheet generously with glue, any advise to make this print succeed on the little Mk4 without making a gooey mess with the glue?
Here’s the PrusaSlicer project file if you’re interested.
If you think it shakes the part loose when moving print plate back and forth, try reducing accelerations and max speed of your Y-axis
Thanks.
I tried lowering the speed (I can’t see any settings to limit it in only one axis though) but from what I read is safest for TPU / TPE, it turns a 2-hour print into a 2-day affair. Not an option for a printer that’s used by everybody in the company all the time.
Have you tried adding “legs” in your model and cutting them off?
I added a giant brim all around the part (connected to the part). The whole thing - part, brim and all - simply comes unstuck.
So I don’t actually have a 3D printer, but from my humble perspective, why don’t you just flip the print and print it on a separate orientation. So the top heavy part is now on the bottom or add extra struts for support to increase the mass of the unstable portion if you are not able to rotate the orientation of the print
It’s heavy on both sides. Also, I need to keep this thin wall facing up because otherwise it would be essentially impossible to remove from the support. And I need the bits facing up to be very clean, while I can afford some nastiness on the bit that faces down after I’m done removing and cleaning the supports.
If you’re open for more unorthodox rambling, is it possible that you can pause the printhead once you’ve printed the initial base area and then tape that down to the table or apply hot glue or another temporary adhesive to provide rigidity?
Is the pei build plate in need of rejuvenation by chance?
I’m not a very active printer, but everything I’ve seen about tpu printing on pei sheets suggests that it sticks too well - oftentimes ripping chunks of pei out.
If your sheet is pretty old, iirc you can rejuvenate it by rubbing it with some fine steel wool.
Also, have you tried a raft instead of a brim?
What have you done to clean the bed? From the link to the textured sheet, you should be cleaning it between every print - after it cools - with 90% IPA, and if you still have adhesion issues, you should clean it with warm water and a couple drops of dish soap.
Has the TPU been dried? I don’t normally print with TPU but my understanding is that it needs to be lower humidity than PLA; I use dryboxes for PLA and target a humidity of 15% or lower and don’t use them if they raise above 20%. The recommendation I saw for TPU was to dry it for 7 hours at 70 degrees Celsius, to target 10% humidity (or at least under 20%) and to print directly from a drybox. Note that compared to other filaments, TPU can’t recover as well from having absorbed moisture - if the filament has gotten too wet, it’ll become too brittle if you dry it out as much as is needed. At that point you would need to start with a fresh roll, which would ideally go into a dryer and then drybox immediately.
You should be able to set different settings for the initial layer to avoid stringing, i.e., slower speeds and longer retraction distance. It’s a bit more complicated but you can also configure the speed for a specific range of layers to be slower - i.e., setting it to slow down again once you get to the top of the print. For an example of that, see https://forum.prusa3d.com/forum/prusaslicer/bed-flinger-slower-y-movement-as-function-of-z/
What’s the max speed you’re printing at? My understanding is that everything other than travel should all be the same speed at a given layer, and no higher than 25 mm/s. And with a bed slinger I wouldn’t recommend a much higher travel, either.
In addition to a brim, have you tried adding supports?
What have you done to clean the bed?
I cleaned it with water and dish soap. There’s nothing like it for adhesion. Even IPA doesn’t quite get the same results.
Has the TPU been dried?
I left it in the dryer at 55C for 3 days. The internal hygrometer says 13%, I tried drying it hotter than that, but then it seems to have trouble travelling through the silicone tube - like friction or something.
What’s the max speed you’re printing at?
Whatever the default is for the Prusa-supplied preset for this very filament brand and make. I just lowered the nozzle temperature to prevent stringing and material “balling up” on the surface, and I raised the bed temperature to increase adhesion a bit.
In addition to a brim, have you tried adding supports?
There is a ton of support for that part: it’s organic support and it’s growing inside and outside the part without ever touching the part itself. The reason being, it’s basically a thin bellows that’s two layers thick, so I don’t want anything supporting the bellows, or any support growing from the bellows, because it’s super-fragile and it won’t survive removing the support. That’s one of the reasons why we ordered a Prusa XL with 2 heads: one will extrude the part in TPU while the other will extrude the support in PLA, which should fall right off.
So since I told the slicer to avoid touching the bellows with the support trees, there’s a lot of it going around it on the outside. And indeed the bits of parts that I managed to print so far seem quite stiff and nicely supported. But the problem is, the entire thing simply comes unstuck and flies off the bed when it becomes too heavy.
how do you measure the percentage of moisture?
To be clear, I’m measuring the relative humidity of the air in the drybox at room temp (72 degrees Fahrenheit / 22 degrees Celsius), not of the filament directly. You can use a hygrometer to do this. I mostly use the hygrometer that comes bundled with my dryboxes (I use the PolyDryer and have several extra PolyDryer Boxes, but there are much cheaper options available) but you can buy a hygrometer for a few bucks or get a bluetooth / wifi / connected one for $15-$20 or so.
If you put filament into a sealed box, it’ll generally - depending on the material - end up in equilibrium with the air. So the measurement you get right away will just show the humidity of the room, but if the filament and desiccant are both dry, it’ll drop; if the desiccant is dry and the filament is wet, it’ll still drop, but not as low.
Note also that what counts as “wet” varies by material. For example, from what I’ve read, PLA can absorb up to 1% or so of its mass as moisture, PETG up to 0.2%, Nylon up to 7-8%… silica gel desiccant beads up to 40%. So when I say they’ll be in equilibrium, I’m referring to the percentage of what that material is capable of absorbing. It isn’t a linear relationship as far as I know, but if it were, that would mean that: if the humidity of the air is 10% and the max moisture the material could retain is 1%, then the material is currently retaining 0.1% moisture by mass. If my room’s humidity is kept at 40%, it’ll absorb moisture until it’s at 0.4% moisture by mass.
That said, this doesn’t measure it perfectly, since while most filament materials absorb moisture from the air when the humidity is higher, they don’t release it as easily. Heating it both allows the air to hold more moisture and allows the filament (and desiccant) to release more moisture.
ah thanks for the insight. somehow I assumed you measure the filament directly, but what you describe sounds good enough. I’ll replicate that in my workshop :)
I’m going to have to second hedgehog’s ideas of cleaning your bed and drying your tpu. Your filament says it should be good for a nozzle temp of 220-240, so I would expect stringing at 235, but it sounds like you are experiencing something a bit more extreme than “some” stringing.
Glue stick washes off in about 30 seconds. I wouldn’t want to use it all the time, but for just 1 part it won’t inconvenience you very much.
I use window cleaner to wipe it off and it’s effortless
In addition to everyone’s suggestions, have you tried rotating the part so it is at a 45 on the bed? This will keep the printer from accelerating as much in the Y direction since it is not a straight motion, I used to have to do that for tall prints on my Mk3 sometimes.
Also, if I were printing that part I would flip it over unless there is some reason you can’t. You might also get more rigidity using normal supports for the large surface facing the bed, might print faster too, tree supports for large areas take a while for me usually.
If you have a PEI sheet, try glue stick on the PEI sheet to print. The glue stick acts as a leveraging agent after printing, you can wash it off with warm water - otherwise the flexibles tend to stick too good and ruin the built plate. I use this method on my prusa mini for TPU where I had similar issues. Sticking flexible filament on the textured sheet can be hard, I had success by printing the brim layer in PLA in the past - but that was still on a Makerbot Mk2 which didn’t even have a heated bed.
I applied some glue to the sheet and it didn’t increase the adhesion by much, but it increased it enough and the print went through okay:
However, now I have another problem: I tried to print another one with the same material and the head started to make clicking noises mid-print and stopped flowing 😢 I’m not sure what’s going on with this now. Maybe I need to raise the temperature or something.
Jam or clog. Time to back the filament out and disassemble your extruder to service it.
It’s not clogged: I fished out the mangled piece of TPU and printed something else with it straightaway - several times. Not sure why it starts clicking like that with that filament. Worse: it seems to do it almost always at the same point in that print.
Did you losen the idler tension screws? TPE requires that the tension is very very light otherwise it tends to buckle around the gear before entering the nozzle tube. Reducing retractions to a minimum is also always a good idea, as well as limiting the max flow rate.
I wasn’t aware. I’ll look into this tomorrow. Thanks!
You were right: after some trial and error, I backed off both idler tensioning screws 2 full turns and then the print went without a hitch. It looks cleaner too. And I don’t know if it’s related (now sure how it would be, but who knows…) the part didn’t warp. First time I get a complete straight TPU part.
Thanks for the tip!
Fantastic! Glad you got it in the end
